Wednesday, August 3, 2022

#Install #docker on #Centos7, #Centos9, #Ubuntu20

Tested OSs: Centos7, Centos9 and Ubuntu 20


Step-1 (Optional)

*Note: Ignore this step, if you are not in installing docker in the University of Tartu's private cloud

- Create the daemon file manually. This is because of some conflict in University's Openstack Environment.

sudo mkdir -p /etc/docker && cd /etc/docker

- Create and update docker daemon file

1
2
3
4
5
6
sudo tee /etc/docker/daemon.json <<EOF
{
	
"default-address-pools": [{"base":"172.80.0.0/16","size":24}]
}
EOF

Step-2

  • Now run this command. It will add the official Docker repository, download the latest version of Docker, and install it:
curl -fsSL https://get.docker.com/ | sh
  • After installation has completed, start the Docker daemon:
sudo systemctl start docker
  • Verify that it’s running:
sudo systemctl status docker
  • Enable docker

    sudo systemctl enable docker

Step-3

To run docker commands with non-root privileges

  • Create a docker group (If it's already created then ignore): sudo groupadd docker
  • Add a user to docker group: sudo usermod -aG docker $USER
  • Activate the changes: newgrp docker
  • Check the installation by displaying docker version: docker --version


 - That's all for now.

Monday, June 20, 2022

Installing #neo4j on #centos 9 using #docker and accessing from #remote...

In this post, you will see how to install neo4j graphDB on a remote with no GUI access. We will install this db on centos9 OS and access the web-based GUI on local machine.

Steps:

  • Login to the remote VM using ssh -i <keyfile> centos@<ip of the VM> command
  • Create following directories
    • mkdir neo4j && cd neo4j
    • mkdir -p data logs import plugins
  • Execute following docker command to download and run neo4j docker image
 docker run \
    -d
    --restart always \
    --publish=7474:7474 --publish=7687:7687 \
    --env NEO4J_AUTH=neo4j/test \
    --user="$(id -u):$(id -g)" \
    --volume=$HOME/neo4j/data:/data \
    -v $HOME/neo4j/logs:/logs \
    -v $HOME/neo4j/import:/var/lib/neo4j/import \
    -v $HOME/neo4j/plugins:/plugins \
    neo4j:latest
  • Now in the local machine, open your terminal or command prompt and execute the following command
      ssh -i <keyfile> -N -f -L localhost:7474:localhost:7474 centos@<Remote VM ip>
  • Now open any web browser and enter following address
    • http://localhost:7474
 In the below video, you can get the detailed steps for more better clarity. Please reach out to me https://kodu.ut.ee/~dehury/ if you have any confusion.

Monday, June 13, 2022

List of Softwares on my PC/Laptop

Browser

yandex firefox chrome

Video

Bandicut ocam

Development/Programming Languages/Editor

Mobaxterm Postman Sublime Text Github Desktop Python Foxit pdf reader

Cloud Storage

Google Drive Dropbox OneDrive

Communication

Outlook Skype Slack Whatsapp Zoom Microsoft Teams

Research Data Management

Zim - A Desktop Wiki TeXstudio MiKTeX zotero publish-or-perish draw.io picpick

Research

Weka Protege Gephi

System Tuning

cpu-z openvpn Process Explorer ccleaner

System Virtualization

Oracle VirtualBox Docker Desktop

Thursday, October 7, 2021

Installing python3 and pip3 on Centos7

Here I have no python3 installed

The most simplest way to install python3
=================
sudo yum install python3

Make python 3.6 as default one
=================
sudo alternatives --install /usr/bin/python python /usr/bin/python3.6 60
sudo alternatives --config python

Check the python version
==================

Check the pip version
==================

Check the pip3 version
==================

Upgrade pip3
=================
pip3 install --upgrade pip --user


Check the pip version

==================


Bonus: Fixing yum package manager

Now lets try to install a random package to check the yum package manager

Install nano
=============
sudo yum install nano
you will get following error

To fix this, Open the /usr/bin/yum file and in the first line, change python to python2
OLD:


NEW:

If again you got similar issue with different file, for example:

Open this file (sudo vi /usr/libexec/urlgrabber-ext-down ) and in the first line change "python" to "python2"


Here is the Youtube demo:


-That's all for now

Monday, September 20, 2021

Managing Kubernetes clusters using Rancher [20Sept2021]


Here is the Environment for me. You may go with single worker node 

Created Tuesday 07 September 2021

Rancher node: Centos 7 (better to keep this separate from cluster nodes), flavor: m3.xsmall
Master Node: Centos 7, m3.xsmall
Worker Node-1: Centos 7, m3.xsmall
Worker Node-2: Centos 7, m3.xsmall

Both Master and Work Node have allow-all security group attached
Minimal ports required are 80/TCP, 443/TCP

[src: https://rancher.com/docs/rancher/v2.x/en/quick-start-guide/deployment/quickstart-manual-setup/

Common installation

  1. Install Docker

  • Create the daemon file manually. This is also because of some conflict in University's Openstack Environment.

        sudo mkdir -p /etc/docker
        sudo tee /etc/docker/daemon.json <<EOF
	{
	  "exec-opts": ["native.cgroupdriver=systemd"],
	  "log-driver": "json-file",
	  "log-opts": {
	    "max-size": "100m"
	  },
	  "storage-driver": "overlay2",
	  "storage-opts": [
	    "overlay2.override_kernel_check=true"
	  ],

"default-address-pools": [{"base":"172.80.0.0/16","size":24}]

	}
	EOF

  • Now run this command. It will add the official Docker repository, download the latest version of Docker, and install it:
curl -fsSL https://get.docker.com/ | sh
  • After installation has completed, start the Docker daemon:
sudo systemctl start docker
ERROR if docker is unable to start, try to check the /etc/docker/daemon.json file
  • Verify that it’s running:
sudo systemctl status docker
  • enable docker to start on boot:
sudo systemctl enable docker
  • To run docker commands with non-root privileges

sudo groupadd docker
sudo usermod -aG docker $USER
newgrp docker

Rancher node

  1. Enter the following command to run rancher container
sudo docker run -d --restart=unless-stopped -p 80:80 -p 443:443 --privileged rancher/rancher
  1. Go to the web browser and hit https://<SERVER_IP_Rancher_Node>
  2. Follow the wizard for initial setup
Once it is done, you should be able to see the dashboard with local as the cluster name

Create a new cluster

src: https://rancher.com/docs/rancher/v2.5/en/quick-start-guide/deployment/quickstart-manual-setup/

  1. Go to the browser and access Rancher Dashboard
  2. From the dashboard, click on Create
  3. Click on Custom
  4. Give Cluster Name as cluster-1 and skipp other infos
  5. Click on Next
  6. Select etcd , Control Plane , Worker
  7. Select the Registration command
    1. The registration command should look like:
sudo docker run -d --privileged --restart=unless-stopped --net=host -v /etc/kubernetes:/etc/kubernetes -v /var/run:/var/run rancher/rancher-agent:v2.6.0 --server https://172.17.90.86 --token bflxwjlsvsrtbnvp8nj5xq82xx2sr5npjsxm82mbtdcfkc9g65x5d8 --ca-checksum f9bc8c23fff67155023fde69026ec83a77f632657f1049fd6ca9ae5732cf59d3 --etcd --controlplane --worker
  1. Go to master node terminal and execute the registration command

At this point you need to wait for few minutes...

  1. After this, you will see in the browser that 1 New node has registered.
  2. Now click on Done
  3. Repeat Step 6 to get the registration command for worker node. For worker node you just need to select Worker

Deleting a node

[src: https://rancher.com/docs/rancher/v2.5/en/cluster-admin/cleaning-cluster-nodes/]
Deleting Docker Containers, Images, and Volumes

Based on what role you assigned to the node, there are Kubernetes components in containers, containers belonging to overlay networking, DNS, ingress controller and Rancher agent. (and pods you created that have been scheduled to this node)

To clean all Docker containers, images and volumes:

docker rm -f $(docker ps -qa)
docker rmi -f $(docker images -q)
docker volume rm $(docker volume ls -q)

Clean the related directories

sudo rm -rf /etc/ceph \
	   /etc/cni \
	   /etc/kubernetes \
	   /opt/cni \
	   /opt/rke \
	   /run/secrets/kubernetes.io \
	   /run/calico \
	   /run/flannel \
	   /var/lib/calico \
	   /var/lib/etcd \
	   /var/lib/cni \
	   /var/lib/kubelet \
	   /var/lib/rancher/rke/log \
	   /var/log/containers \
	   /var/log/kube-audit \
	   /var/log/pods \
	   /var/run/calico

It is now good to reboot the VM with following command:

sudo reboot


-That's all

Saturday, April 3, 2021

Cloud Cost Comparison : 1vm/mo

 In this post, we will explore and compare the cost of hosting a small VM for 1 month in different clouds. 

1. Serverspace

https://serverspace.us/services/cloud-servers/
Pricing Ref:         https://serverspace.us/pricing/
Configuration: Ubuntu 18.04, 1GB, 1core, 50Mbps, 25GB SSD
Cost/mo:         USD 4.55
Cost/hr:              USD 0.006


2. Kamatera Cloud

https://www.kamatera.com/express/compute/
Configuration: Ubuntu 18.04, 1GB, 1core, 50Mbps, 20GB SSD
Cost/mo:         USD 4.00
Cost/hr:                 USD 0.005
Pricing Ref:         https://www.kamatera.com/express/compute/?tcampaign=35187_368194&bta=35187&nci=5344


3. Linode

https://www.linode.com
Configuration: 1GB, 1core, 25GB SSD, 1TB, 40GB NW In, 1000Mbps NW Out
Cost/mo:         USD 5.00
Cost/mo:         USD 0.0075
Pricing Ref:         https://www.linode.com/pricing/


4. ScalaHosting

https://www.scalahosting.com/cloud-servers
Configuration: Ubuntu 20.04, 2GB, 1core, 50GB SSD, 3000GB bandwidth
Cost/mo:         USD 10.00
Cost/hr:                 USD 0.015
Pricing Ref:         https://my.scalahosting.com/order.php?a=configure&i=0


5. Cloudways

https://www.cloudways.com/
Using there interface you only can create VMs in other cloud provideres, such as DigitalOcean, Linode, VULTR, AWS, Google Cloud
Pricing Ref: https://www.cloudways.com/en/pricing.php


6. LiquidWeb

https://www.liquidweb.com/products/cloud-dedicated/
Configuration: Linux, 2GB, 2 vCPU, 40GB SSD, 10TB bandwidth
Cost/mo:             USD 15 (if you go for 24months plan)
Other Addon:        InterWorx, Plesk Web Pro, or cPanel Admin
Ref:                         https://www.liquidweb.com/products/vps/


7. SiteGround

https://www.siteground.com/cloud-hosting.htm
Configuration: 8GB, 4cores, 40GB SSD, 5TB data transfer
Cost/mo:         USD 80.00
Pricing Ref:         https://www.siteground.com/cloud-hosting.htm?afcode=b0dbbe40d137d9fab687993c2f1ce093&campaign=Cloud+Hosting


8. DigtialOcean

https://www.digitalocean.com/
Configuration: 1GB, 1CPU, 25GB SSD, 1TB data transfer
Cost/mo:         USD 5.00
Cost/hr:                 USD 0.00744
Pricing Ref:         https://www.digitalocean.com/pricing/


9. Vultr

https://www.vultr.com/
Configuration: 512MB, 1CPU, 10GB SSD, 0.5TB data transfer
Cost/mo:         USD 3.5 (can be 2.5USD if you choose IPv6 version only )
Cost/hr:                 USD 0.005
Pricing Ref:         https://www.vultr.com/products/cloud-compute/#pricing


10. Amazon Web Services

https://aws.amazon.com/
Configuration: 1GB, 2vCPU, 10GB HDD, 0.5TB data transfer
Cost/mo:         USD 4.02 
Cost/hr:                 USD 0.005
Pricing Ref:         https://calculator.aws/#/createCalculator/EC2  


Tuesday, December 29, 2020

Sending emails uisng Apache Nifi

In this post, we will see how one can send email to others using processors provided by Apache Nifi. 

Assume, we want to send email from sendername@gmail.com to receivername@gmail.com.

For this 

  • we need to have the login credential for sendername@gmail.com email account. 
  • Need to set Apache Nifi running.
In this demonstration, we will generate dummy random files and send them to receivername@gmail.com.

Steps:

  1. Access Nifi user interface.
  2. Bring GnerateFlowFile processor into the canvas 
  3. Configure  GnerateFlowFile processor as shown in below figure.

Figure : Configuration of GenerateFlowFile processor

  1. Now bring PutMail processor into the canvas
  2. Configure  PutMail processor as shown in below figure.
Figure : Configuration of PutMail processor
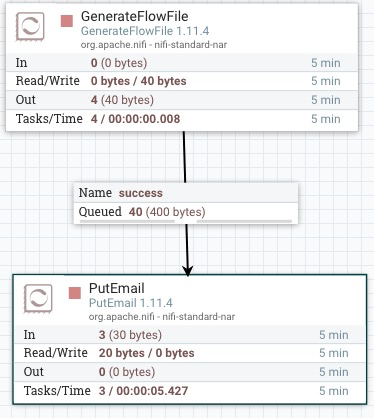
  1. Connect GnerateFlowFile to PutMail processor as shown below.
  1. Now configure your gmail account and allow Nifi to login and send emails on your behalf.
  2. For above, Sign in to your Gmail account
  3. Now visit below link: https://myaccount.google.com/security?rapt=AEjHL4MPOlIXcaCs-jP2OdP7-Sg31QTMNhC7WbO6I08_VwUe2u5--dz6TedtBcYIYo0Ch2IfRYqErD677n9CCBrPnYgRnHcpXw
  4. Make sure that Less secure app access is ON as shown in below:

  1. Now start above processors and you should be receiving the dummy emails.


- That's all, comment if you face any difficulties.