Showing posts with label google. Show all posts

Saturday, April 3, 2021

Cloud Cost Comparison : 1vm/mo

 In this post, we will explore and compare the cost of hosting a small VM for 1 month in different clouds. 

1. Serverspace

https://serverspace.us/services/cloud-servers/
Pricing Ref:         https://serverspace.us/pricing/
Configuration: Ubuntu 18.04, 1GB, 1core, 50Mbps, 25GB SSD
Cost/mo:         USD 4.55
Cost/hr:              USD 0.006


2. Kamatera Cloud

https://www.kamatera.com/express/compute/
Configuration: Ubuntu 18.04, 1GB, 1core, 50Mbps, 20GB SSD
Cost/mo:         USD 4.00
Cost/hr:                 USD 0.005
Pricing Ref:         https://www.kamatera.com/express/compute/?tcampaign=35187_368194&bta=35187&nci=5344


3. Linode

https://www.linode.com
Configuration: 1GB, 1core, 25GB SSD, 1TB, 40GB NW In, 1000Mbps NW Out
Cost/mo:         USD 5.00
Cost/mo:         USD 0.0075
Pricing Ref:         https://www.linode.com/pricing/


4. ScalaHosting

https://www.scalahosting.com/cloud-servers
Configuration: Ubuntu 20.04, 2GB, 1core, 50GB SSD, 3000GB bandwidth
Cost/mo:         USD 10.00
Cost/hr:                 USD 0.015
Pricing Ref:         https://my.scalahosting.com/order.php?a=configure&i=0


5. Cloudways

https://www.cloudways.com/
Using there interface you only can create VMs in other cloud provideres, such as DigitalOcean, Linode, VULTR, AWS, Google Cloud
Pricing Ref: https://www.cloudways.com/en/pricing.php


6. LiquidWeb

https://www.liquidweb.com/products/cloud-dedicated/
Configuration: Linux, 2GB, 2 vCPU, 40GB SSD, 10TB bandwidth
Cost/mo:             USD 15 (if you go for 24months plan)
Other Addon:        InterWorx, Plesk Web Pro, or cPanel Admin
Ref:                         https://www.liquidweb.com/products/vps/


7. SiteGround

https://www.siteground.com/cloud-hosting.htm
Configuration: 8GB, 4cores, 40GB SSD, 5TB data transfer
Cost/mo:         USD 80.00
Pricing Ref:         https://www.siteground.com/cloud-hosting.htm?afcode=b0dbbe40d137d9fab687993c2f1ce093&campaign=Cloud+Hosting


8. DigtialOcean

https://www.digitalocean.com/
Configuration: 1GB, 1CPU, 25GB SSD, 1TB data transfer
Cost/mo:         USD 5.00
Cost/hr:                 USD 0.00744
Pricing Ref:         https://www.digitalocean.com/pricing/


9. Vultr

https://www.vultr.com/
Configuration: 512MB, 1CPU, 10GB SSD, 0.5TB data transfer
Cost/mo:         USD 3.5 (can be 2.5USD if you choose IPv6 version only )
Cost/hr:                 USD 0.005
Pricing Ref:         https://www.vultr.com/products/cloud-compute/#pricing


10. Amazon Web Services

https://aws.amazon.com/
Configuration: 1GB, 2vCPU, 10GB HDD, 0.5TB data transfer
Cost/mo:         USD 4.02 
Cost/hr:                 USD 0.005
Pricing Ref:         https://calculator.aws/#/createCalculator/EC2  


Tuesday, December 29, 2020

Sending emails uisng Apache Nifi

In this post, we will see how one can send email to others using processors provided by Apache Nifi. 

Assume, we want to send email from sendername@gmail.com to receivername@gmail.com.

For this 

  • we need to have the login credential for sendername@gmail.com email account. 
  • Need to set Apache Nifi running.
In this demonstration, we will generate dummy random files and send them to receivername@gmail.com.

Steps:

  1. Access Nifi user interface.
  2. Bring GnerateFlowFile processor into the canvas 
  3. Configure  GnerateFlowFile processor as shown in below figure.

Figure : Configuration of GenerateFlowFile processor

  1. Now bring PutMail processor into the canvas
  2. Configure  PutMail processor as shown in below figure.
Figure : Configuration of PutMail processor
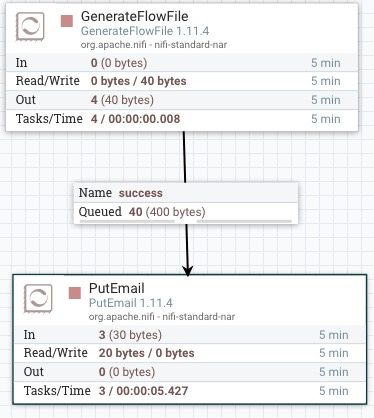
  1. Connect GnerateFlowFile to PutMail processor as shown below.
  1. Now configure your gmail account and allow Nifi to login and send emails on your behalf.
  2. For above, Sign in to your Gmail account
  3. Now visit below link: https://myaccount.google.com/security?rapt=AEjHL4MPOlIXcaCs-jP2OdP7-Sg31QTMNhC7WbO6I08_VwUe2u5--dz6TedtBcYIYo0Ch2IfRYqErD677n9CCBrPnYgRnHcpXw
  4. Make sure that Less secure app access is ON as shown in below:

  1. Now start above processors and you should be receiving the dummy emails.


- That's all, comment if you face any difficulties.


Thursday, December 10, 2020

Securing Apache Nifi with firewalld

In our previous post, we have learned how to secure Apache Nifi with Google's OAuth2. In that post we saw, how user can be authenticated via Google's OAuth client ID. 

In this post, we will see how the outside user can be blocked permanently from accessing Apache Nifi's UI. Here outside user mean, the user who is access UI from different machine.

For this, we will use firewalld to block the port. This can be done from local/remote terminal. But to automate the whole process, we will use Ansible.

It is assumed that, you have installed Nifi. This post will not cover how to install and configure Apache Nifi using Ansible.

 Here are the steps:

Steps:

1. Install firewall

1
2
3
4
- name: Install firewalld
  package:
    name: "firewalld"
    state: present

2. Enable Firewalld, you don't need to reboot the server.

5
6
7
8
9
- name: enable firewalld
  service:
    name: firewalld
    state: started
    enabled: yes

3. Now instruct Firewalld to block 8080 port permanently

10
11
12
13
- name: do not permit traffic in default zone on port 8080/tcp
  shell: "firewall-cmd --remove-port={{port}}/tcp --permanent"
    args:
      executable: /bin/bash

4. Now reload the Firewalld to reflect the changes

14
15
16
17
- name: reload firewall
  shell: "firewall-cmd --reload"
    args:
      executable: /bin/bash

Now run the Ansible playbook and verify if it working. Push a comment if you got any issue.


- That's all


Friday, December 4, 2020

Securing Nifi with Google's OAuth 2.0 provider

This post is about securing the NiFi and user will be authorized by Google using OAuth 2.0 login provider.


So the scenario is like this:

  • I have my own PC.
  • I have Google account with Gmail ID reachchinu(\at)gmail(\dot)com
  • OpenStack Cloud is provided by the  university where I am working.
  • I have an instance running in the Openstack cloud.
  • IP of that instance is 172.17.66.101.
  • NiFi is running here

Current Setup:

 Now I am accessing the Nifi instance with out any security. Anyone with the IP and port with in the the University network can access the Nifi's UI.

What I need:

 NiFi should ask some kind of login info before allowing anyone to access the UI.

What can be done:

Enable the security feature of Nifi. After this, every time you are trying to access Nifi's UI, you need to make yourself authenticated with your Google's OAuth 2.0 provider. 

Pre-requisite:

I have access to that Nifi instance over SSH.

Nifi is installed on /usr/local/bin directories

Steps: 

  1. Install and configure Nfi : 

    1. Follow URL: https://nifi.apache.org/docs/nifi-docs/html/walkthroughs.html 

    2. Nifi is installed on /usr/local/bin

    3. Nifi version: 1.11.4

    4. Stop Nifi service if it is running

cd /usr/local/bin

./nifi-1.11.4/bin/nifi.sh stop


  1. Download Nifi toolkit to /usr/local/bin: https://archive.apache.org/dist/nifi/1.11.4/nifi-toolkit-1.11.4-bin.tar.gz 

  2. Unzip the downloaded toolkit in the same location

  3. Make sure current directory is /usr/local/bin/

  4. Execute following command to generate signed certificate for localhost

./nifi-toolkit-1.11.4/bin/tls-toolkit.sh standalone -n "localhost"

  1. Copy the new content with following content

cp -rv ./localhost/* /usr/local/bin/nifi-1.11.4/conf/.

  1. Open the nifi.properties file present in the /usr/local/bin/nifi-1.11.4/conf directory:

        sudo vim /usr/local/bin/nifi-1.11.4/conf/nifi.properties

  1. Edit following line (remove localhost)

nifi.web.https.host=<give here IP>.xip.io

  1. Open authorizer.xml file

sudo vim /usr/local/bin/nifi-1.11.4/conf/authorizers.xml

  1. Edit following line in <userGroupProvider> section

<property name="Initial User Identity 1">YOUR_ACCOUNT@gmail.com</property>

  1. Edit following line in <accessPolicyProvider> section

<property name="Initial Admin Identity">YOUR_ACCOUNT@gmail.com</property>

  1. At the end authorizer.xml file should look like below:

<userGroupProvider>

        <identifier>file-user-group-provider</identifier>

        <class>org.apache.nifi.authorization.FileUserGroupProvider</class>

        <property name="Users File">./conf/users.xml</property>

        <property name="Legacy Authorized Users File"></property>

       <property name="Initial User Identity 1">reachinu@gmail.com</property>

</userGroupProvider>


<accessPolicyProvider>

        <identifier>file-access-policy-provider</identifier>

        <class>org.apache.nifi.authorization.FileAccessPolicyProvider</class>

        <property name="User Group Provider">file-user-group-provider</property>

        <property name="Authorizations File">./conf/authorizations.xml</property>

        <property name="Initial Admin Identity">reachinu@gmail.com</property>

        <property name="Legacy Authorized Users File"></property>

        <property name="Node Identity 1"></property>

        <property name="Node Group"></property>

</accessPolicyProvider>


  1. Before proceeding next, have the following information:

    1. IP address of the Nifi instance

    2. Port number 

         You can get this from /usr/local/bin/nifi-1.11.4/conf/nifi.properties file

The line looks like nifi.web.https.port=8443

  1. [src2] Login to the Google Developers Console with your Google account:
    https://console.developers.google.com/apis/credentials 

  2. Select project if you want to change as shown in below figure:

  1. Click on “CREATE CREDENTIALS” as shown in above figure.

  2.  Now select “OAuth client ID”:

  1. Fill the next page according to the figure below:
    Application type: 

Name: 

URIs: Change IP address and port number as per your case 

  1. Now click on “CREATE” 

  2. In the next dialog box, you will see the Client ID and Client secret.

  3. Note down following thing :

    1. Your Email add, which is used in the project

    2. Client ID

    3. Client Secrete 

    4. And following url:

https://accounts.google.com/.well-known/openid-configuration 

  1. Open the nifi.properties file present in the /usr/local/bin/nifi-1.11.4/conf directory:


nifi.security.user.oidc.discovery.url=https://accounts.google.com/.well-known/openid-configuration

nifi.security.user.oidc.connect.timeout=5 secs

nifi.security.user.oidc.read.timeout=5 secs

nifi.security.user.oidc.client.id=<YOUR-CLIENT-ID>

nifi.security.user.oidc.client.secret=<YOUR-CLIENT-SECRET>

nifi.security.user.oidc.preferred.jwsalgorithm=


  1. At this point, it is expected that the Nifi is stopped

  2. Now start the Nifi 

./nifi-1.11.4/bin/nifi.sh start

  1. Now go the browser (Here I am using Mozilla firefox) and enter 

https://<ip address >.xip.io:<port number> 

E.g. https://172.17.66.105.xip.io:8443 


Click on “Advanced...”

Click on “Accept the Risk and Continue”.

Enter your email address and other details. 

In my case I entered reachinu@gmail.com


Possible Errors:


  1. If you put wrong email address, you will be prompted following message:


  1. In your browser, if you ignore .xip.io part, you will be prompted following message:


  1. If you try to access nifi with http instead of https, you will get some random character or something like following: 


References

[src1]: https://nifi.apache.org/docs/nifi-docs/html/walkthroughs.html 

[src2]: https://bryanbende.com/development/2017/10/03/apache-nifi-openid-connect 


Note: This work is partially funded by the European Union’s Horizon 2020 research and innovation project RADON (825040).