Showing posts with label Ubuntu. Show all posts

Wednesday, August 3, 2022

#Install #docker on #Centos7, #Centos9, #Ubuntu20

Tested OSs: Centos7, Centos9 and Ubuntu 20


Step-1 (Optional)

*Note: Ignore this step, if you are not in installing docker in the University of Tartu's private cloud

- Create the daemon file manually. This is because of some conflict in University's Openstack Environment.

sudo mkdir -p /etc/docker && cd /etc/docker

- Create and update docker daemon file

1
2
3
4
5
6
sudo tee /etc/docker/daemon.json <<EOF
{
	
"default-address-pools": [{"base":"172.80.0.0/16","size":24}]
}
EOF

Step-2

  • Now run this command. It will add the official Docker repository, download the latest version of Docker, and install it:
curl -fsSL https://get.docker.com/ | sh
  • After installation has completed, start the Docker daemon:
sudo systemctl start docker
  • Verify that it’s running:
sudo systemctl status docker
  • Enable docker

    sudo systemctl enable docker

Step-3

To run docker commands with non-root privileges

  • Create a docker group (If it's already created then ignore): sudo groupadd docker
  • Add a user to docker group: sudo usermod -aG docker $USER
  • Activate the changes: newgrp docker
  • Check the installation by displaying docker version: docker --version


 - That's all for now.

Saturday, May 4, 2019

Ansible: Installation and Configuration

Ansible is an open-source software provisioning, configuration management, and application deployment tool. It runs on many Unix-like systems, and can configure both Unix-like systems as well as Microsoft Windows. Before proceeding for the installation, it is necessary to get yourself comfortable with basic knowledge.

Ansible Wikipedia: https://en.wikipedia.org/wiki/Ansible_(software)
Official Documentation: https://docs.ansible.com/ 

1. Ansible installation

1.1.  Through pip

The easy way to install ansible is through pip, which is a python package manager.
Prerequisite:
> For before installing ansible, make sure that python3 is already installed.  
> Once Python3 is installed go ahead to install pip
    Sudo easy-install pip3
> Now install ansible through pip3
    pip3 install ansible

1.2.  Through apt (ubuntu)

$ sudo apt-get update
$ sudo apt-get install software-properties-common
$ sudo apt-add-repository --yes --update ppa:ansible/ansible
$ sudo apt-get install ansible

2.  Basic Configuration:

If ansible is installed manually through pip, the ansible_host inventory file needs to be created manually. Following this you also need to check the reachability of remote servers.

2.1. Adding host file if NOT present

If the ansible is installed using pip3, you will not find any host inventory in the directory /etc/ansible/hosts

if you execute the command ansible webservers --list-hosts this will give an error something like "unable to parse the inventory file in /etc/ansible/hosts". This means that no directory named ansible in /etc/ directory is present. For this follow steps below:

1: cd /etc/
2: sudo mkdir -p ansible/hosts/
3: vim ansible_host
[localhost]
127.0.0.1
[webservers]
[dbservers]
[myhomepage]
[testservers]

4: now enter the command ansible testservers --list-hosts
This will list the webservers that are listed in the group called [testservers]

2.2. Connecting to remote host using ssh


1: open the ansible_host inventory file
vim /etc/ansible/hosts/ansible_host
2: add the following host group or host
[myhomepage]
160.153.137.40 ansible_port=<sshport#> ansible_user=username1 ansible_ssh_pass=user1password

It is assumed that you are able to login to that remote using ssh and using above credentials.
3: now save the ansible_host file
4: enter following command
ansible myhomepage -m ping

2.3. Disabling ssh key host checking

Open the config file in /etc/ansible/ansible.config
Find for #host_key_checking = false. Uncomment the line to make it enable.
[src]: https://docs.ansible.com/ansible/latest/installation_guide/intro_installation.html#latest-releases-via-pip

-Thats all for now.

Monday, March 19, 2018

Scheduling Ubuntu program with gnome-schedule

In Ubuntu you can schedule any task to run automatic or on a specific time.
For this either you can use gnome-schedule GUI or using crontab command.

Using gnome-schedule

=========================
1.   First make sure your program is running properly.
2.   Open the terminal (using Ctrl+Atl+t shortcut key).
3.   Enter the following command to install gnome-schedule
sudo apt-get install gnome-schedule
4.   Enter gnome-schedule command in the terminal window to open the desired GUI, as given below.

5.   Now click on "New" button.
6.   Select "A task that launches recurrently" option to execute the programm repeatedly in a specific time inerval.


7. Enter the Description and Command in corresponding fields.
8. Click Advanced radio button to explicitly mention the execution time. Now click on "Add" button.
    Examples:
                    Minute: 5, Hour: 15,  Day: *, Month: *, Weekday: *
                          This will execute the program Everyday, every month, at time 15:05 (3:05 PM)

    Click here to see some examples.  


Using crontab command

==========================
1.   Open terminal (using Ctrl+Atl+t shortcut key).
2.   Enter crontab -e
3.   Add one line in following format at the end of the file.
          <minute> <hours> <day> <month> <weekday> <Command to execute>
4.   Now save the file.

That's all.


Friday, March 16, 2018

Different ways to open a notification/dialoge box in Ubuntu

Different ways to display a dialog box or a status message in Ubuntu.

1.   notify-send -i /home/user/Desktop/notifications.ico "MsgSummary"  "This is message body !!!"

2.
     gxmessage "This is message body"
     gxmessage -file message.txt
     gxmessage -center -timeout 3 -fg RED -file message.sh

3.
     whiptail --msgbox "This is the message" 10 50
     whiptail --yesno "Press wither yes or no" 10 50

4.
     dialog --msgbox "This is the message" 10 50

5.
     zenity --info --text="Here is the message body"
     zenity --calendar
     zenity --color-selection
     zenity --password

Please see user manual of each command for more detailed information.
You can find more ways. Please comment if more options are there to display a message.


-Thanks

Thursday, March 15, 2018

Making the backup process simple and automatic

Let's we have two Ubuntu servers:

Server-1: IP: 1.2.3.10 (source server )
                 user account name: user1
                 user account password: user1
                
Server-2: IP: 1.2.3.11 (Destination server)

--------------------------------------------------

On Server-1
1. Install openssh-server. You may install through terminal.
2. configure openssh-server if needed, else leave it to the default configuration.

On Server-2
1.  Install openssh-server and sshpass through the terminal.
2.  Change the current directory to $USER/Desktop/backup
3.  Create the directory "data"
3.  Create a password file "pw.txt" with following content.
"pw.txt" content
user1
 4.  Create a shell script file with the name "backup.sh" with following content.
backup.sh content
sshpass -f pw.txt scp -r user1@1.2.3.10:data/*  /home/server2/backup/data/

5.  Make sure pw.txt and backup.sh files are in the same directory.
6.  Execute following command in the terminal
    bash backup.sh
   This  will copy all the content from user1@1.2.3.10:data/ path on Server-1 to /home/server2/backup/data/ directory on Server-2.

--------------------------------------------------

Now its time to schedule the bash backup.sh command to execute in a specific time interval

Make sure you have gone thorugh crontab manual page or gnome-schedule GUI. You may also go through this page to know more details on crontab and gnome-schedule.

1.  Open terminal
2.  Enter following command
crontab -e
3. If you are executing this command for the first time, it will ask for the choice to open an editor.
4. In the editor add following line at the end of the file.
0,12 * * * * bash /home/server2/backup/backup.sh
5. Save and exit the editor.

You can also use gnome-schedule command to schedule the "backup.sh"


-Thats all


Sunday, March 11, 2018

Installing Docker on Ubuntu 14.04 OS [Update]

Steps:

  s1:    sudo apt-get update
  s2:    sudo apt-get install \
                  apt-transport-https \
                  ca-certificates \
                  curl \
                  software-properties-common
  s3:    curl -fsSL https://download.docker.com/linux/ubuntu/gpg | sudo apt-key add -
  s4:    sudo add-apt-repository \
                  "deb [arch=amd64] https://download.docker.com/linux/ubuntu \
                  $(lsb_release -cs) \
                  stable edge"
  s5:    sudo apt-get update
  s6:    sudo apt-get install docker-ce
  s7:  For testing the docker
           sudo docker run hello-world

 Create the "docker" group
   sudo groupadd docker
Add the current user to the "docker" group
   sudo usermod -aG docker $USER

Now logout and then login again from the currnet session.

You can download and run the following shell script file.
InstallDocker.sh

Saturday, June 10, 2017

X11 forwarding using Xming X server for Windows

Problem statement:

Let's say, We have 2 two computers: One with Ubuntu OS and other with Windows OS
Through SSH connection, "How can we access the any application's interface (GUI) installed on Ubuntu computer from Windows computer ?". For example, we want to access the GUI of calculator application that is installed on Ubuntu from Windows computer.

Environment:

First computer:
                       OS- Ubuntu 14.04 64-bit
                       Openssh-server package
Second computer:
                       OS- Windows 8 64bit
                        Xming software tool

Here, for demonstration, we will open GUI of calculator application
The command to open the calculator in Ubuntu is gnome-calculator                      

Step-1:
On Ubuntu Computer, install openssh-server package.

Perform Step-2 to 5 on Windows computer.
Step-2:
On Windows computer: 
Download Xming for Windows 8 64bit.
Install Xming executable file. You don't have to do any changes. Leave everything to the default selection.

Step-3: 
Now open command prompt on Windows computer
Change the directory to the location where Xming is installed. In my case it is "C:\Program Files (x86)\Xming"


cd "c:\Program Files (x86)\Xming"

Step-4:
Now enter the following command to start Xming on Windows


Xming.exe -multiwindow -clipboard


Step-5:
Now its the time to connect to the Ubuntu computer through inbuilt putty. In this step, you need to provide the login information, and the command to open required application.

The command can be

plink -ssh -2 -X user1@<IP of ubuntu computer> -P <port number of SSH server> <command to open the required application>


e.g.

plink -ssh -2 -X chinmaya@120.162.56.85  -P 23 gnome-calculator


Here, I am connecting to the Ubuntu computer through ssh protocol 2.
The IP address and SSH port number of Ubuntu computer is 120.162.56.85 and 23, respectively.
gnome-calculator is the command to open the GUI of calculator application.

After entering the above command, you need to give the corresponding password. If all goes well, the required GUI will appear on Wondows computer.

Please comment if you need more information or if you have any suggestion.

-Thank you


Thursday, October 27, 2016

Which port is opened in my Linux system ?

netstat command can be used to know all ports opened currently.

command 

netstat  <option>

option:
-a                              short form of '--all'
-t or --tcp                  for tcp connection
-u or --udp                for udp connection
-n                              for numeric presentation

Example

netstat -atn                     for all tcp connection
netstat -aun                    for all udp connection

netstat -ltn                     for all ACTIVE tcp connections
netstat -lun                     for all ACTIVE udp connections

Friday, October 21, 2016

Uninstalling Docker-engine from Ubuntu 14.04

Completely Uninstalling Docker-engine including Configuration data and other dependencies

        sudo apt-get purge --auto-remove docker-engine

Uninstalling Docker and its dependencies

        sudo apt-get remove --auto-remove docker-engine

Uninstalling Docker and its configuration data

        sudo apt-get purge docker-engine

Uninstalling only Docker

        sudo apt-get remove docker-engine

Thursday, September 8, 2016

Golang and Shell Script : Execute sh file from Go file and vice-versa.

We will see here today, executing a Go file from Shell script file and vice-versa.

Don't know, how to create and run a shell script file ?
Shell script file name : hello_sh.sh
Content of hello_sh.sh :

echo "Hello, I am inside 'hello_sh.sh' file."
echo "Now, I am going to call 'hello_go.go' file. The output: "
go run hello_go.go


Hello world ! program in Golang.
Go file name : hello_go.go
Content of hello_go.go :


package main
import (
        "bytes"
        "fmt"
        "log"
        "os/exec"
        "strings"
)
func main() {
        fmt.Printf("Hello, I am from 'hello_go.go' file.");
        fmt.Printf("\nNow, I am going to execute 'hello_sh.sh' file\n");
        cmd := exec.Command("bash", "hello_sh.sh");
        cmd.Stdin = strings.NewReader("");
        var out bytes.Buffer;
        cmd.Stdout = &out;
        err := cmd.Run();
        if err != nil {
                log.Fatal(err);
        }
        fmt.Printf("Output \n",out.String());
}


*For beginner change the file name "hello_sh.sh" and  "hello_go.go" according to your requirement.
*For advanced programmer, try this recursion and you can comment your output below.


-Thank you


Monday, July 25, 2016

Shell Script :generating random numbers

Generating random numbers is bit easier as compare to generating random numbers in other languages.

To generate a random number in shell script use below command
$RANDOM

The above command is case sensitive and hence $random will not give you desire result.

Generating  random number with in a range
lr=100 # lower range
ur=600 # upper range
r=`expr $ur - $lr`
echo "The random number of `expr $RANDOM % $r + $lr`"


-Thank you

Sunday, July 24, 2016

Shell Script : Reading a file Line by Line in shell script

Reading the file using loop statement

File name : job.txt
File Content :
   Data
   RAM:256 MB
   Bandwidth:1 gbps

Command 1:
        
              while read line
              do
                echo $line
              done <job.txt 
Output :
 
   Data
   RAM:256 MB
   Bandwidth:1 gbps


Command 2:
        
              for line in $(cat job.txt)
              do
                echo $line
              done <job.txt 
Output :
  
   Data
   RAM:256
   MB
   Bandwidth:1
   gbps

Saturday, July 23, 2016

Shell Script : Creating and Running a shell script file

OS : Ubuntu 14.04
Steps are as follows:

Step 1: Open Terminal by pressing ctrl+alt+T

Step 2: Use any editor to create a shell script file. 
       
         Sample 1:  sudo gedit firstShell.sh 
         Sample 2:  sudo vim firstShell.sh 
         Sample 3:  sudo vi firstShell.sh 

Step 3: Enter the following line
        
          echo "I am from firstShell.sh file !!!"  
 
Now save the file according to the editor you are using.
Step 4: Modify the attribute of the file as executable file
        

         Sample:  sudo chmod +x firstShell.sh  
 
Step 5: Now RUN the shell script file by entering following command in the terminal

         ./firstShell.sh

VirtualBox from command line

Different VirtualBox operation from command line :

To know the Version of the VirtualBox
Command :
                vboxmanage -v
Sample Output:


To show the list of VMs:
Command :
                vboxmanage list vms
Sample Output :


To show the list of currently running VMs:
Command :
                vboxmanage list runningvms


To display the details of a specific VM
Command :
                vboxmanage showvminfo VM1
Sample Output :
* "VM1" is the name the VM
* The screenshot of Sample Output is NOT containing all the information.


To create a Virtual machine :
Command 1:
                vboxmanage createvm --name "VM2"
Sample Output :

After creating the VM, follow the below step to showed up in the "Oracle VM virtualBox manager"
Step 1- Select "Machine" menu.
Step 2- Click "Add" option.
Step 3- Browse to path of setting file
Step 4- Double click on "VM2.vbox" file
Now you can see the detail of VM2 as follows:


Command 2:
                vboxmanage createvm --name "VM2" --register
* --register option will register the VM with VirtualBox and hence this will enable us to display the recently created VM in "Oracle VM virtualbox manager" window.


To modify the settings of an already created VM
Command 1: [To modify the memory]
                vboxmanage modifyvm VM2 --memory 512
Command 2: [To assign the OS type]
                vboxmanage modify VM2 --ostype Ubuntu
Command 3:[To attach the SATA controller ]
                vboxmanage storagectl VM3 --name SATA -add sata --controller IntelAhci --bootable on
Command 4: [To attach the SATA (.vdi file)]
                vboxmanage storageattach  VM3 --storagestl SATA --port 0 --device 0 --type hdd --medium <path of the .vdi file>


To clone a Virtual machine :
Command 1 : 
                vboxmanage clonevm VM1_CPU --name VM1_IO --register
Sample Output :


 To control the network bandwidth 
Command :
                1. vboxmanage bandwidthctl VM1 add Limit --type network --limit 100k
                2. vboxmanage bandwidthctl VM1 set Limit --type network --limit 100k


Tuesday, June 21, 2016

Configure openssh-server in ubuntu.

ssh enables one computer to communicate to another computer over a secure encrypted channel. In order to establish the environment we need both ssh server on the target computer and ssh client on the computer from where we intend to access the target computer.

In this post, we'll see how to install ssh-server on the target computer (server)


Requirement:
     OS on target computer : Ubuntu 14.04 or later
     Target computer must be connected to internet to get the required software packages.

Installation:


        1. open the terminal by pressing

 ctrl + Alt + t  


        2. Now enter the following command to install ssh-server

sudo apt-get install openssh-server

              Use sudo for if you are not in root, else you can avoid using

Configuring openssh-server:

        1. Configuration file : To configure, we need to modify sshd_config file present inside /etc/ssh/

        2. Backup : Before configuring, please take a backup of the configuration by entering following command in the terminal

sudo cp /etc/ssh/sshd_config /etc/ssh/sshd_config_backup

        3. Open configuration file by entering following command.
sudo nano /etc/ssh/sshd_config 
             
        4.  Configure ssh port number. Find the line
 port 22  
             now change the port number according to your requirement.
        5.  Deny root login: Find the line
 PermitRootLogin without-password  

             Now change the line to
 PermitRootLogin no  

        6.  Allow specific user : At the end of the file add following line.

 AllowUsers user1 user2  

             this will restrict all other users with username other then user1 and user2

Above are the basic configuration to start playing with ssh.
Don't forget to restart the ssh service after every modification. To restart the ssh server, use following command
sudo service ssh restart
   
For more information, just comment below.


-Thank you

Friday, June 17, 2016

Accessing Linux (Ubuntu) account remotely through SSH

Its easy to access your linux account exactly sitting in-front of the personal computer. But how about accessing your linux account from another place which is far from the personal computer. Follow below steps to access your linux account.
Definition
Target Computer: the computer to which you want to connect or we can say your personal computer. <refer figure 1>
Source Computer: The computer from which you want to access your target computer. <refer figure 1>
Figure 1: Accessing target Computer from Source computer


Requirement:
    1. Target computer must be turned ON

    2. Target computer must have internet connection
        or
        Source computer must be accessible from target computer through LAN, WAN or in anyway.

    3. Software requirement for Source Computer :
        Putty: which can be downloaded from below link
        For windows: http://tartarus.org/~simon/putty-snapshots/x86/putty.exe
        For Mac & Ubuntu : Use “Terminal” . // No third party software is required
       
    4. Software requirement for Target Computer :
        openssh-server : openssh-server must be install on your personal computer to accept the connection from another computer present remotely

Steps: 

For Target Computer
  1. We assume that Ubuntu is installed on target computer
  2. Install openssh-server by executing below command in the “Terminal”
sudo apt-get install openssh-server
      3. follow below link to configure the openssh-server
               http://blogchinmaya.blogspot.com/2016/06/configure-openssh-server-in-ubuntu.html

For Source Computer

For Windows

    S1: download and install Putty for windows from below link.
    S2: Open putty
Figure 2: Putty in Windows


    S3: Here, it needs 2 main information.
         S3.1: Enter the address of the target computer
         S3.2: Enter the ssh port number on target computer
    S4: Select "SSH" radion option
    S5: now click on "Open" button to connect to the target computer
Figure 3: Putty Login window 
     S6: Now enter your username and password

For Mac & Linux (ubuntu)

    S1: open Terminal (FOR MAC)
         S1.1 : press <command> + <Space> 
         S1.2 : search for “terminal”

Figure 4: Open terminal in mac
    S1: Open Terminal (for Ubuntu)
         You can open the trminal by pressing < ctrl > + < alt > + < t > 

    S2: gather following information
           S2.1: Account name and password in target computer
           S2.2: address of the target address
           S2.3: port, on which ssh server is running on the target computer
    S3: enter following command in terminal
ssh <username>@<address> -p <port number>
           Now enter your password
e.g.


Thats all, its done. Now you can browse the your filesystem using common linux command.

Thursday, May 14, 2015

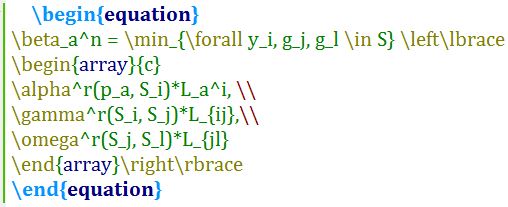
LaTeX : Part - 4 : Examples of Mathematical equations - Advance.

In previous post, we have discussed the basic to write a mathematical equation. In following section we will be discussing on some advance equations.

Some samples on advanced mathematical equation:

Source Code Output
 

Some more to come Some more to come

Wednesday, September 10, 2014

Start, Stop, Restart and know status of Apache2 in Ubuntu.

Commands to do basic operation with apache2 in Ubuntu.

OS: Ubuntu 12.04 LTS
OS Type: 32-bit 

Start apache2 

 Command : "sudo service  apache2 start"


 Stop apache2 

 Command : "sudo service  apache2 stop"
 

Restart  apache2

Command :  "sudo service  apache2 restart"
 

Status of apache2


Command  : "sudo service  apache2 status"


-Thank You

---