Showing posts with label Data pipeline. Show all posts

Tuesday, December 29, 2020

Sending emails uisng Apache Nifi

In this post, we will see how one can send email to others using processors provided by Apache Nifi. 

Assume, we want to send email from sendername@gmail.com to receivername@gmail.com.

For this 

  • we need to have the login credential for sendername@gmail.com email account. 
  • Need to set Apache Nifi running.
In this demonstration, we will generate dummy random files and send them to receivername@gmail.com.

Steps:

  1. Access Nifi user interface.
  2. Bring GnerateFlowFile processor into the canvas 
  3. Configure  GnerateFlowFile processor as shown in below figure.

Figure : Configuration of GenerateFlowFile processor

  1. Now bring PutMail processor into the canvas
  2. Configure  PutMail processor as shown in below figure.
Figure : Configuration of PutMail processor
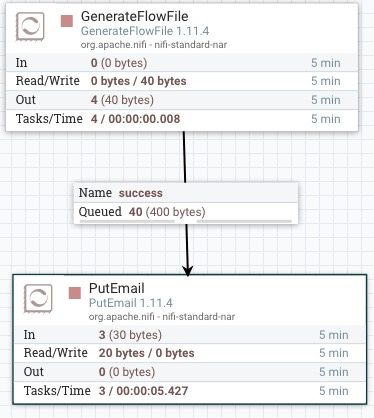
  1. Connect GnerateFlowFile to PutMail processor as shown below.
  1. Now configure your gmail account and allow Nifi to login and send emails on your behalf.
  2. For above, Sign in to your Gmail account
  3. Now visit below link: https://myaccount.google.com/security?rapt=AEjHL4MPOlIXcaCs-jP2OdP7-Sg31QTMNhC7WbO6I08_VwUe2u5--dz6TedtBcYIYo0Ch2IfRYqErD677n9CCBrPnYgRnHcpXw
  4. Make sure that Less secure app access is ON as shown in below:

  1. Now start above processors and you should be receiving the dummy emails.


- That's all, comment if you face any difficulties.


Wednesday, December 9, 2020

Integrating Apache Nifi with Azure Storage

 In this post we will see how Apache Nifi can be used to handle the blobs/files in Azure Blob storage.

We will go through:

  • Creating a Storage account in Microsoft Azure
  • Creating Nifi template that download the files/blobs from Azure blob storage
  • Creating a Nifi template that upload files to the blob storage
  • Creating a Nifi template that delete blobs/files from the blob storage

Prerequisites:

It is expected that, you have fundamental knowledge on 

Steps:


1. Create the Storage Account

  1. Go to Azure home portal: https://portal.azure.com/?quickstart=True#home 

  2. Click on Storage Account :

  1. Click on Add Button, if you don’t have a Storage account. Below figures are for your reference:


  1. Now go to the Storage Account portal: https://portal.azure.com/?quickstart=True#blade/HubsExtension/BrowseResource/resourceType/Microsoft.Storage%2FStorageAccounts 

  2. Click on the storage account name

  3.  Under “Blob service” section

    1. Click on Containers.

    2. Click + Container button to create a new container

    3. Give a name and leave others to default

    4. Now click on the Create button at the bottom. 

    5. Now click on container name 

    6. Click on Upload button to upload a file

  4. Now you need to get the Access Keys

    1. Under Settings section, click on Access Keys 

    2. Now click on Show Keys button

    3. Note down the Key (not connection string) under key1

2. Nifi template for downloading the blobs from a container

  1. Go to Nifi interface

  2. Create a ListAzureBlobStorage processor.

  3. Configure with following properties

    1. Container Name: Get the name you have created in previous step

    2. Storage Credentials:

      1. Create a new Controller Services “AzureStorageCredentialsControllerService”

      2. Properties are: Storage Account name (same as you have created before), Storage Account Key (same as you have noted down in previous step)

      3. Now Enable the Controller Service 

  4. Create a FetchAzureBlobStorage processor with the same properties of  ListAzureBlobStorage processor. 

  5. Create a PutFile processor, with the following properties:

    1. Directory: /tmp/azure/success (you can change this according to your requirement)

    2. Leave rest properties to default

  6. Create a PutFile processor, with the following properties. This is just to track if anything goes wrong:

    1. Directory: /tmp/azure/fail (you can change this according to your requirement)

    2. Leave rest properties to default

  7. Now the Nifi template should look like below:

3. Nifi template to UPLOAD files to a container

  1. Get the following processors and connect them.

  1. Properties of GetFile:

  1. Properties of PutAzureBlobStorage processor:


4. Nifi template to delete files/blob from a container

  1. Create the following nifi processor:

  1. Properties of ListAzureBlobStorage processor:

  1. Properties of DeleteAzureBlobStorageprocessor:

Here I am deleting only one blob(i.e. Image 2.png) . But you can leave the Blob properties to its default value to delete all the blobs