Saturday, July 2, 2016

Latex : Part - 5 : Writing Algorithm/Pseudocode in Latex


Requirement :
  • You should have updated Latex repository
  • Any editor for writing latex code, such as TexStudio, Notepad++, Sublime Text etc.
Step:
  • In order to write a pseudo code or an algorithm in Latex , you must use algorithm package at the beginning of the document 
  • Below are some examples, you can follow.
Example - 1
Output
Figure-1.a : Example 1 output
Source Code 


Figure-1.b : Source code for the output given in Figure-1.a


Note:
  1. Please insert \; at end of each statement.
  2. "\qquad" command is used to give a horizontal tab at the beginning of the line.
Example - 2
   Note:

  • Use algorithmic package 
                          
Output

Figure 2.a: Example 2

Source Code 


Figure 2.b :  Source code for output in Figure 2.a 
Example - 3
Note:
  • Use following packages
Output


Source Code


Tuesday, June 21, 2016

Configure openssh-server in ubuntu.

ssh enables one computer to communicate to another computer over a secure encrypted channel. In order to establish the environment we need both ssh server on the target computer and ssh client on the computer from where we intend to access the target computer.

In this post, we'll see how to install ssh-server on the target computer (server)


Requirement:
     OS on target computer : Ubuntu 14.04 or later
     Target computer must be connected to internet to get the required software packages.

Installation:


        1. open the terminal by pressing

 ctrl + Alt + t  


        2. Now enter the following command to install ssh-server

sudo apt-get install openssh-server

              Use sudo for if you are not in root, else you can avoid using

Configuring openssh-server:

        1. Configuration file : To configure, we need to modify sshd_config file present inside /etc/ssh/

        2. Backup : Before configuring, please take a backup of the configuration by entering following command in the terminal

sudo cp /etc/ssh/sshd_config /etc/ssh/sshd_config_backup

        3. Open configuration file by entering following command.
sudo nano /etc/ssh/sshd_config 
             
        4.  Configure ssh port number. Find the line
 port 22  
             now change the port number according to your requirement.
        5.  Deny root login: Find the line
 PermitRootLogin without-password  

             Now change the line to
 PermitRootLogin no  

        6.  Allow specific user : At the end of the file add following line.

 AllowUsers user1 user2  

             this will restrict all other users with username other then user1 and user2

Above are the basic configuration to start playing with ssh.
Don't forget to restart the ssh service after every modification. To restart the ssh server, use following command
sudo service ssh restart
   
For more information, just comment below.


-Thank you

Friday, June 17, 2016

Accessing Linux (Ubuntu) account remotely through SSH

Its easy to access your linux account exactly sitting in-front of the personal computer. But how about accessing your linux account from another place which is far from the personal computer. Follow below steps to access your linux account.
Definition
Target Computer: the computer to which you want to connect or we can say your personal computer. <refer figure 1>
Source Computer: The computer from which you want to access your target computer. <refer figure 1>
Figure 1: Accessing target Computer from Source computer


Requirement:
    1. Target computer must be turned ON

    2. Target computer must have internet connection
        or
        Source computer must be accessible from target computer through LAN, WAN or in anyway.

    3. Software requirement for Source Computer :
        Putty: which can be downloaded from below link
        For windows: http://tartarus.org/~simon/putty-snapshots/x86/putty.exe
        For Mac & Ubuntu : Use “Terminal” . // No third party software is required
       
    4. Software requirement for Target Computer :
        openssh-server : openssh-server must be install on your personal computer to accept the connection from another computer present remotely

Steps

For Target Computer
  1. We assume that Ubuntu is installed on target computer
  2. Install openssh-server by executing below command in the “Terminal”
sudo apt-get install openssh-server
      3. follow below link to configure the openssh-server
               http://blogchinmaya.blogspot.com/2016/06/configure-openssh-server-in-ubuntu.html

For Source Computer

For Windows

    S1: download and install Putty for windows from below link.
    S2: Open putty
Figure 2: Putty in Windows


    S3: Here, it needs 2 main information.
         S3.1: Enter the address of the target computer
         S3.2: Enter the ssh port number on target computer
    S4: Select "SSH" radion option
    S5: now click on "Open" button to connect to the target computer
Figure 3: Putty Login window 
     S6: Now enter your username and password

For Mac & Linux (ubuntu)

    S1: open Terminal (FOR MAC)
         S1.1 : press <command> + <Space
         S1.2 : search for “terminal

Figure 4: Open terminal in mac
    S1: Open Terminal (for Ubuntu)
         You can open the trminal by pressing < ctrl > + < alt > + < t

    S2: gather following information
           S2.1: Account name and password in target computer
           S2.2: address of the target address
           S2.3: port, on which ssh server is running on the target computer
    S3: enter following command in terminal
ssh <username>@<address> -p <port number>
           Now enter your password
e.g.


Thats all, its done. Now you can browse the your filesystem using common linux command.

Wednesday, May 20, 2015

GO Programming Language : Executing external system command using "Go" language

Prerequisite : you must have basic knowledge of how to execute a programming in Go language.
How execute first hello world program.

In following section, we will discuss, how to execute an external program. My goal is, instead of executing a command in terminal, I want to execute using Go programming language.

Source Code:
package main
import (
        "bytes"
        "fmt"
        "log"
        "os/exec"
        "strings"
)

func main() {
        cmd := exec.Command("docker","ps","-a")
        cmd.Stdin = strings.NewReader("")
        var out bytes.Buffer
        cmd.Stdout = &out
        err := cmd.Run()
        if err != nil {
                log.Fatal(err)
        }
        fmt.Printf("Output \n",out.String())
}

Output:
Ahh... I got a long list of output as expected.


Description:
In the source, I was trying to execute the following command
docker ps -a
For this, I pass the above command as argument to function "command" as different strings.
When I tried to pass whole command (i.e. docker ps -a) as a single string, it produce an error saying "exec: "docker ps -a": executable file not found in $PATH exit status 1". This means the first argument is the name of the executable file and in order to execute the command it tries to search the file mentioned in first string in function "exec.Command()". Since in my case the actual executable file name is "docker", this couldn't execute the "docker ps -a" command.
So, every word in the command (or the external program we want to execute) must be provided as different string to "exec.Command()".

That's all for now.


-Enjoy


GO Programming Language : First day with GO - Executing "Hello world" program.

OS : Ubuntu 12.04


Command to install
sudo apt-get install gccgo-go

Now type "go version" to know the version of  Go.
here is my output
go version xgcc (Ubuntu 4.9.1-0ubuntu1) 4.9.1 linux/amd64

Now its time to move on to our first hello world program.
Use any editor to create a Go file. Here I am using "vim" editor. Now create a Go file using following command. Depending upon the editor you are using following may differ.
vim hello.go

Now press i to enter INSERT mode and copy the following content

package main
import "fmt"

func main(){
   fmt.Printf("Hello, World\n");
}


Now press ":wq" to save and exit from editor.
Enter following command to run and see the output
go run hello.go

output:


That's all for now.


-Enjoy

Thursday, May 14, 2015

LaTeX : Part - 4 : Examples of Mathematical equations - Advance.

In previous post, we have discussed the basic to write a mathematical equation. In following section we will be discussing on some advance equations.

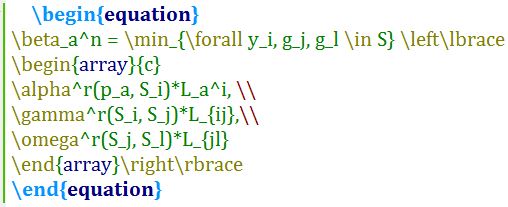
Some samples on advanced mathematical equation:

Source Code Output
 

Some more to come Some more to come

Friday, May 8, 2015

LaTeX : Part - 4 : Examples of Mathematical equations - Basic.

In following section we will have some examples, how to write mathematical equations in Latex.

Please use following package:
For more information on "amsmath" package, please click here.
Use of $ (Dollar symbol)

$ is generally used in a paragraph, where some part of paragraph such as variables, special symbols etc are required to display in math mode.

Example-1 :
Hello reader, here is the first math equation example. For this $ a + b $ , below is the output.

Output

Example-2 :
Hello reader, here is the first math equation example. For this $$ a + b $$ , below is the output.

Output
 
 Henceforth, we will use $$ instead of $.

Here is list of some sample codes and their output:

Source Code Output


Some more to come Some more to come


Monday, October 27, 2014

How to compile Linux kernel module.

** In the following example Ubuntu 12.04 is used.
** Ubuntu 12.04 is installed on VMware as VM

Steps are as follows:
1. Login as "root"
2. Execute following commands.
   a. sudo apt-get update
   b. sudo apt-get install make
   c. sudo apt-get install build-essential
   d. sudo apt-get install linux-headers-$(uname -r)
3. create a Makefile using following command
          vi Makefile
4. insert following content into the Makefile and save it.


5. create "hello.c" file and insert following content.


6. Keep both "Makefile" and "hello.c" file in same directory.
7. execute following commands
    a. make
    b. insmod hello.ko
          After executing above command you should get the message "Hello, Baby..."
          This command load the "hello" module.
    c. rmmod hello
        output:  "Goodbye, cruel world....."
          This command unload the above inserted module.


*Oracle VirtualBox can be use as an alternative for VMware (See how to)
*See how to install Ubuntu on Oracle VirtualBox. (link)


-Thank  you


Monday, October 20, 2014

How to install Ubuntu on Oracle VirtualBox.

To install Ubuntu onto VirtualBox follow below mentioned steps.

1.   Download Ubuntu OS from below link.
        For latest version: http://www.ubuntu.com/download/desktop
        For old releases : http://old-releases.ubuntu.com/releases/

2.   Download and install Oracle VirtuaklBox. [See How To]

3.   Watch below video to install Ubuntu onto VirtualBox
     
       Link: http://youtu.be/Kk7Fhdy3Ypw

*The same way you can install any OS onto Oracle VirtualBox


-Thank you


How to Install Oracle Virtual Box

Follow below steps to Install Oracle VirtualBox.
* Here I am Using VirtualBox for Windows 64.

Go to the link below Download VirtualBox.
http://www.oracle.com/technetwork/server-storage/virtualbox/downloads/index.html

Watch the below Video to install Oracle VirtualBox.


YouTube link :  http://youtu.be/7z9DoEu_OVw
Next session we'll discuss how to install an OS onto Oracle VirtualBox.


-Thank You